Troubleshooting Audio Visual Equipment
If you are installing or planning an Audio Visual system, making sure it is all set-up and functioning correctly is priority. However, technical issues do sometimes happen; therefore how do you resolve them?
Here’s HowToAV’s top troubleshooting Audio Visual equipment tips…
 Check all devices on the system are fully compatible
When looking at your system you have specified, checking all elements are compatible and work together in a system is crucial. For example, with products using HDBaseT, where one might expect multiple brands to be corss-compatible, some manufacturers take the HDBaseT platform and adapt it by adding extra features.Therefore, there may be some level of cross -ompatibility between products, but it is always worth checking before you try to put brand A with brand B to check that all functions and features work throughout a;; devices on the system.
 Use your supplier’s technical support team
If you’re needing reliable and easy sources of information and knowledge on your devices or the system, then we strongly recommend contacting your manufacturers and suppliers. A good AV supplier will have experts within the team to provide help and free advice on a system design. This can be even more beneficial when there is a large variety of products to choose from, and for more advanced systems with a wider range of technicalities to learn about.
 Ensure all cables are connected securely
It can often be the simplest of things that can affect your system’s performance. Don’t forget that simply checking if there are any power cables or AV signal cables which may have come loose can be the solution to your problem. And the larger the system, the more cables there are to affect the performance of your AV installation. making usre you are using high quality cables and connectors which engage and fit correctly can be beneficial.
 Ensure all cables are wired up correctly
Check if any cables are not in the right socket and that everything is wired up correctly. Once again this is basic but another easy troubleshooting step which is all-to-often overlooked!
Test HDMI cables
It’s always best to use a test kit and test HDMI cables before they’re installed into the system incase it is faulty.

Power check – turn it off and on again!
Check that everything is powering up correctly. You can even run a simple power off/on reset to test that everything is working.

Complete a step-by-step AV system check
In a simple source to TV connection, there’s not a lot you can test apart from: checking if they are both on, checking the HDMI cable is working – if not then switch the HDMI cable. If the issue still isn’t resolved it could either be a faulty source, a faulty cable or a faulty screen.
In larger AV systems, there might be more components to deal with such as a source, an AVR and a video distribution system sending it out to more devices and a screen at the end. If the problem is that the source is not getting to the screens, then a simple signal path analysis is needed step by step, with testing at each point to see where the signal stops.
AV System equipment check example diagram:
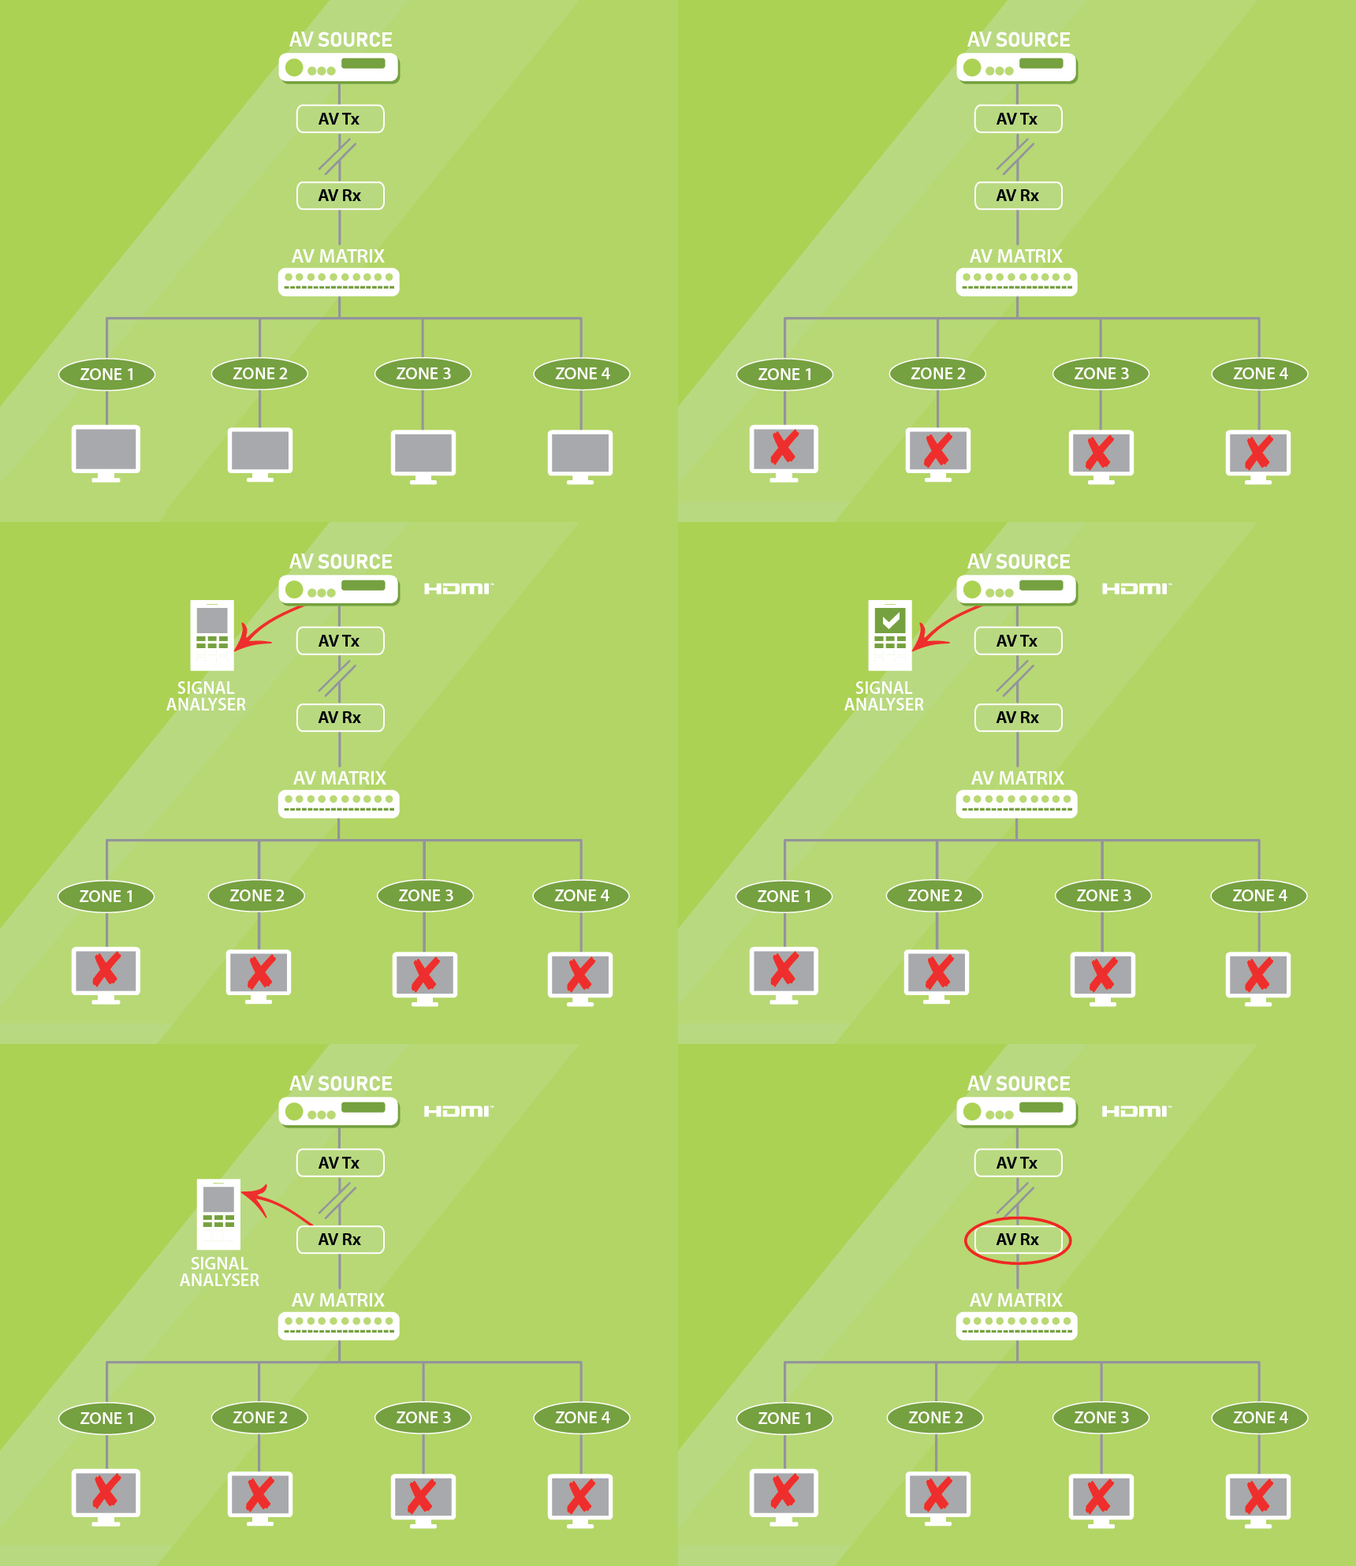
An example using a XA-3P signal analyser/pattern generator – going from your source by HDMI into the signal analyser. The signal analyser will tell you there and then, if the product is outputting a signal, if it’s 4K, what colour spacing it is, what the audio format is. All of that information will come through the source and will tell you if the source is outputting correctly or not. This can be also be done further along the signal path by checking at the AVR (audio video receiver). So from the AVR, you come out of that with HDMI into the signal analyser. The analyser will tell you again if the product is outputting a signal, what the audio format is etc. But if there’s no signal coming out of the AVR, then it’s best to check the cabling again and if the AVR is powered on as well as checking the configuration within the AVR.